DIgest Mismatch ERROR – github ENTERPRISE sso – azure AD

When setting up Github Enterprise Cloud plan single sign on – SSO for Microsoft Azure active directory, you may encounter the ‘FAILED: digest mismatch‘ error when test/saving your SSO configuration.

SSO configuration on github:-

When you hit test SAML configuration before saving button on Github, it will test the SSO configuration to your Azure AD , the Idp provider. You need to input your Sign on URL, unique URL, Certificate (base64) given that you already completed the configuration on Azure AD. You can find the complete Azure AD SSO configuration guide for your specific Github product here from Microsoft, the values are different for Github Organization and Github Enterprises.

You will receive the SAML Signing certificate from Azure by default SHA256 signing algorithm, once saved you can download the Base64 format for input into Github SSO config.

Back to Github SSO config page, once you paste the SHA256 certificate in Base64, you will see the confirmation “Your SAML provider is using the RSA-SHA256 Signature Method and the SHA256 Digest Method”

From there if you try to test/save the configuration it will attempt to test the configuration and after a while returns the error ‘FAILED: digest mismatch

Googling around did not prove very useful however I did find this old github blog – SHA256 support for fingerprints. Debugging my SAML response I noticed the two lines below referencing ‘Digest’ Which tells me that my Digest Method algorithm is that of SHA256. I also read that Github uses OmniAuth

Further digging led me to compare my above SAML response digestMethod algorithm with the github omniauth-saml strategies library found here

This tells me my signing algorithm is SHA256 but Github expects SHA1.

Changing my certificate signing algorithm to SHA1, and providing the SHA1 fingerprint to Github SSO configuration solved the ‘Digest mismatch’ error and my SSO configuration was successful. However this was all in a test environment, but I would not recommend to generate SHA1 certificate in production for use, rather you can generate a SHA256 and then calculate the SHA1 fingerprint using openSSL and use that SHA1 fingerprint on Github SSO config.

This other blog from Gitlab.com SAML related issues says:-

Please note, we currently support SHA-2 as the certificate signature algorithm and we recommend for the certificate to be generated using SHA-2(256) or higher. It is only the certificate fingerprint that requires a SHA-1. The risk on using SHA-1 for the fingerprint is not as great as having the certificate generated using SHA-1.

A little understanding of certificate encryption vs certificate fingerprint:-

The algorithm of the fingerprint/thumbprint is unrelated to the encryption algorithm of the certificate. The fingerprint/thumbprint is a identifier used by some server platforms to locate the certificate in a certificate store.

In conclusion, use a tool such as openSSL, calculate the SHA1 fingerprint from your SHA256 certificate, and use that to complete your Github SSO config. Sample command will be:-

openssl x509 -noout -fingerprint -sha1 -inform pem -in "MyCertificate-domain.com.cer"

Github Enterprise SSO Configuration successful:-

Good luck!

Microsoft.Exchange.MailboxAssistants.Assistants.ELC.ElcEwsException.ArchiveExchangeWebServiceNotAvailable – error after offboarding user mailbox from exchange online to onpremis

On SCOM monitoring server below alert was raised for some user mailboxes on Exchange 2016 on-premise server. In this case, Exchange 2016 is hybrid configured, and some users offboarded from exchange online back to exchange on-premise.

Full alert description from SCOM:-

Probe: {Compliance/ELCComponent_LastSuccessTooLongAgo}
Mailbox guid: {d5xxe174-xxxxxx-b5d8-324xxxx5d93}
In Org: {}
Is archive: {IsArchiveMailbox = False}
With stack trace: {The difference: 7.89530321780208 days between today: 11/26/2021 8:41:11 AM and the date of last successful ELC run: 11/18/2021 11:11:57 AM for mailbox: d5xxe174-xxxxxx-b5d8-324xxxx5d93 is above the threshold: 7; Exception message: Microsoft.Exchange.MailboxAssistants.Assistants.ELC.ElcEwsException.ArchiveExchangeWebServiceNotAvailable.}
Get last ELC exception from Export-MailboxDiagnosticLogs -Component MRM then statistics with -ExtendedProperties and look at all ELC properties, specifically the value of ELCLastSuccessTimestamp. If mailbox is Archive use -Archive.

In my case, a few user mailboxes were offboarded from exchange online to on-premise Exchange 2016 with exchange online archiving still active on those mailboxes and the on-premise exchange servers are in DMZ, not internet facing.

If you run the command suggested by SCOM in the alert details:-

Export-MailboxDiagnosticLogs -Identity Mailboxname -ComponentName MRM

You will see the full error, and look closely at the exception warning:-

ELC EWS failed with error type: ‘ArchiveExchangeWebServiceNotAvailable’. Message: Archive EWS url is unknown.

Next, you can verify the on-premise user mailbox who has exchange online archiving enabled on Exchange online using these commands

Get-Mailbox <on-premises user mailbox> | FL *archive*

Full list of commands:- https://docs.microsoft.com/en-us/exchange/hybrid-deployment/create-cloud-based-archive#step-2-verify-that-the-cloud-based-archive-mailbox-is-created

Take note of the populated mailbox ArchiveGuid and ArchiveName, ArchiveStatus properties

Microsoft says the only supported archive split scenario is a primary mailbox on-premises and an archive mailbox in Exchange Online. (https://docs.microsoft.com/en-us/office365/troubleshoot/archive-mailboxes/archive-mailbox-issues)

For me, we did not need to have exchange online archiving enabled for the on-premise users, we followed the steps Scenerio 5 with provided script to cleanup

Solution(s)

If you have the user primary mailbox seated on-premise and its archive mailbox seated in exchange online and your on-premise exchange servers are on DMZ i.e not internet facing, then:-

  • You will face this error on your dmz exchange if you don’t use a web proxy or proxy firewall is not configured to allow exchange on-premise server to connect to exchange online on port 443, so talk to your network admin, make sure your dmz exchange can reach exchange online.

Lastly, if non of the above scenarios applies to your case, Microsoft provides resolution to several other scenarios, in the link of this documentation ( https://docs.microsoft.com/en-us/office365/troubleshoot/archive-mailboxes/archive-mailbox-issues):-

  • Scenario 1 – Onboarding: You move your on-premises Microsoft Exchange Server mailboxes to Exchange Online.
  • Scenario 2 – Onboarding: Your archive mailbox exists in Exchange Online, and you move your primary mailbox from your on-premises Exchange Server environment to Exchange Online.
  • Scenario 3 – Offboarding: You enable an archive mailbox and then migrate both your primary and archive mailboxes from Exchange Online to your on-premises Exchange Server environment. A similar scenario occurs when your primary mailbox is already on-premises and you decide to offboard your archive mailbox from Exchange Online to your on-premises Exchange Server environment.
  • Scenario 4 – Offboarding: Your primary mailbox does not have an archive mailbox enabled, and you move your primary mailbox from Exchange Online to your on-premises Exchange Server environment.
  • Scenario 5 – Offboarding: Your primary mailbox exists in your on-premises Exchange Server environment, and your archive mailbox exists in Exchange Online. This scenario may occur when you take one of the following actions:
    • You offboard your primary mailbox. However, you leave your archive mailbox in Exchange Online.
    • Both primary and archive mailboxes are located in your on-premises Exchange Server environment. However, you onboard only your archive mailbox.

IBM cloud port 25 Sendgrid email services

IBM cloud offers sendgrid email delivery services for your SMTP TCP port 25 applications hosted on IBM cloud. This is because the most common port for SMTP, the port 25 for outbound connections for sending email is not allowed on IBM cloud and several other cloud providers, this is due to too many abuse cases in the past – IBM Cloud says – As of 28 October 2015, IBM Cloud no longer allows outbound connections through TCP port 25 (SMTP) on new accounts:- https://cloud.ibm.com/docs/email-delivery?topic=email-delivery-email-delivery-faw#can-i-use-outbound-email-on-port-25-

On IBM Cloud I am running an exchange 2016 test environment and to be able to perform outbound SMTP connections, I need to have port 25 open, as well as other SMTP ports. We now know IBM cloud blocks outbound port 25, and offers sendgrid email service as an alternative.

I will show you how to setup sendgrid email services, and configure your send connector on Exchange to use sendgrid as a smarthost, to allow you to relay email to sendgrid and from sendgrid it will send your email externally using port 25. You can have a free sendgrid account from IBM Cloud if you plan to send less than 25,000 emails per month. If you need to send more, here are the pricing options:-

  1. To begin, go over to your IBM cloud dashboard, expand the navigation menu on the top left

expand the pin, classic infrastructure and scroll down to services – click open Email delivery

you will see the button to order email delivery

2. Choose the option for free package if you plan to send less than 25,000 a month or any of the pricing options depending on your need as i previously showed in above screenshot. Once done and your service is online, it will appear under Email delivery service with options to view your account details and settings.

3.

Click the check mark button to Enable SMTP, and then expand the Actions arrow to show more options:-

4. We can go directly to sendgrid access portal, by clicking on it:-

Configure Exchange 2016 to use sendgrid

5. To configure your email application on IBM Cloud to use sendgrid as smarthost for SMTP relay, from the sendgrid dashboard, on the left side, click on Email API and then >> Integration guide >> SMTP Relay

6. Follow the steps to name and create and API key, take note of your API key string which will also be your password, so, username and password, server name. As for ports, since we cannot use port 25 on IBM cloud, we can use port 465 or 587 to relay messages to sendgrid. leave this dashboard open we will come back later once exchange side is done.

7. Login to your exchange admin center EAC, go to mail flow >> send connectors, create a new send connector for sendgrid, click + to add new send connector :-

name your send connector, type – custom,

Under network settings, select route mail through smart hosts, click on the + to add the sendgrid server name:-


Add smtp.sendgrid.net , the servername that we copied from the sendgrid dashboard, click on next

Next, select Basic authentication, choose offer basic authentication only after starting TLS for security, enter your username and password you copied from the sendgrid dashboard earlier

Click the + to add your source server – your exchange server that will be responsible for sending mail to sendgrid and once done, click finish to create your new send connector, which will be visible in your EAC send connectors. Make sure it is enabled.

8. By default your new exchange send connector will use port 25, so we have to change this to port 587, to do this, we need to run below command from exchange management shell

Set-sendconnector -identity “name of your newly created send connector” -Port 587

Once done, you can do Restart-service MSExchangetransport to make sure your changes take effect immediately.

You are done. Go over to your sendgrid dashboard that we left open and do the final steps, tick i’ve updated my settings and verify.

Test sending email from Exchange.

Now all your outbound emails from Exchange will use your new send connector to relay messages to sendgrid and from sendgrid it will be sent to your recipients. From your sendgrid dashboard you can view all the statistics for your messages. Also you can study the message header of your email to see how the message was routed to external recipient.

For all other SMTP applications other than Exchange, you can refer to sendgrid documentation on how to configure this for your application – https://sendgrid.com/docs/for-developers/sending-email/getting-started-smtp/

Thanks, I hope you found this useful, feel free to comment and add suggestions.

Winmail.dat attachment

Content-Type: application/ms-tnef; name="winmail.dat"

Winmail.dat attachment – One of my user sending emails from Outlook application and Exchange online office365 complains the recipient is receiving a winmail.dat attachment in every email she sends to one specific recipient domain, however, the same email is received by yahoo and other email domain without any winmail.dat attachment. Sender has tried setting her outlook to ensure ‘only plain text’ is used when composing email but still recipient is getting winmail.dat. So why is this one specific recipient domain getting winmail.dat attachments even when outlook has been set to use only plain text?

Solution:

1. Make sure to get more details if you can about the recipient domain mail system, for me I found out from their website that they recommend ‘plain text’ emails over html or rich text, as their mail system can have problems decoding other mail formats.

2. Check the message email headers of your sender, you can see the content-type showing “winmail.dat” instead of content-type “plain text” :-

Content-type in Message header of email sent that contains winmail.dat:-

Content-Type: application/ms-tnef; name="winmail.dat"

Content-type in Message header of email sent that uses plain text and does not contain winmail.dat:-

Content-Type: text/plain; charset="us-ascii"

3. What is winmail.dat?

Outlook and Exchange uses the Transport Neutral Encapsulation Format (TNEF) format for your emails that contains rich text format (RTF), RTF files offer some formatting features like bold, italic, underline, bullets, different fonts, and text justification. Messaging systems that aren’t based on Microsoft Exchange may be unable to interpret messages that use this rich text format. If the recipient’s messaging system can’t process this format, a file attachment that’s called Winmail.dat is added to the message.

Note: By default, email messages that are sent from Exchange Online in Office 365 use the Transport Neutral Encapsulation Format (TNEF) format

4. If your recipient domain email system cannot decipher TNEF and a winmail.dat is received, then Office 365 admins can use Exchange online PowerShell to change the message format to prevent the Winmail.dat attachment from being sent to those external recipients. To do this:-

Connect to Office365 Exchange Online using Remote PowerShell

  1. Run the following Windows PowerShell commands to configure the message format as plain Text Only for a specific external recipient:
Set-MailContact <ExternalEmailAddress or GUID> -UseMapiRichTextFormat Never
Set-MailContact -Identity <ExternalEmailAddress or GUID> -UsePreferMessageFormat $True 

Run the following Windows PowerShell command to confirm that the message format was applied:-

Get-MailContact | Select <ExternalEmailAddress or GUID> | Select UseMapiRichTextFormat

2. To Change the message format for all messages that are sent to a specific domain
This method requires you to create a remote domain object in Exchange Online to control how messages are sent to external domains. You can also use this method to change the message format for messages that are sent to coexistence domains.

Connect to Office365 Exchange Online using Remote PowerShell

Run the following Windows PowerShell command to create a remote domain for an external domain:

New-RemoteDomain -Name <Name of External Domain> -DomainName 

Run the following Windows PowerShell command to prevent messages from being sent in rich text format:

Set-RemoteDomain -Identity <Name of Domain> -TNEFEnabled $false 

Run the following WindowsPowerShell command to check that the setting was applied:

Get-RemoteDomain -Identity <Name of Domain>| Select TNEFEnabled 

More info on Microsoft docs – https://docs.microsoft.com/en-us/exchange/mail-flow/content-conversion/tnef-conversion?view=exchserver-2019

How to Setup your own Virtual Machine on IBM Cloud for lab practice – $200 free credit

Hi guys, today I’m gonna show you how to subscribe and get $200 worth of credit on IBM cloud, configure a Virtual machine of your choice – I will be using Red Hat Enterprise Linux 7 virtual machine instance for demonstration, setup ssh private and public key and remote login password-less to my machine on IBM cloud.

  1. Visit https://www.ibm.com/cloud – You can spend sometime to read on the various offerings and features IBM cloud offers compared to other providers Azure / google / Amazon
  2. Sign up with your email address for a free account, the free account limits you to certain features (lite) until you upgrade to a pay-as-you-go account, so go ahead and upgrade to a pay-as-you-go account, you will be asked to provide a valid credit card for verification purposes, however no charge will be made on your credit card, except you decide to purchase additional services later. For this series we will only use the free $200 credit on our pay-as -you-go account to create our first virtual machine instance.
  1. Once done, login to IBM cloud, you will be presented with your dashboard, on the upper left click on the navigation menu. You can watch this video to have a quick overview on how to navigate the IBM cloud dashboard – https://cloud.ibm.com/docs/overview?topic=overview-ui
  1. From the navigation menu , click on “resource list” -> “Create Resource” , you will be presented with the Catalog dashboard, then we will select “compute” to configure our virtual server instance.
  1. Choose “virtual server”, and select the options you need for your virtual server instance, you can also see the order summary menu on your right.
  1. For this demonstration we will select the following specs:

Balanced B1.2×4, 2vcp, 4gbram, location Europe Frankfurt data center, RHEL 7 for the OS, free 25GB boot disk, free 100Mbps – total estimate 0.15 euro per hour

6. You have various options to select the different OS version for example Microsoft Server 2019, if you select the drop down menu, you will be presented with other versions of Windows as well – 2016, 2012, 2012 R2.

7. Another thing great about this order menu, if you select lower specs than the operating system can normally support, it will auto choose the minimum supported specs for your OS.

Verify your order summary, agree to the terms, and click on create

8. Once your virtual server instance is done provisioned, you can browse all the different functions and menu, make note of the public IP assigned to your VM, the passwords for admin login, billing starts whenever your machine is powered on based on the hourly rates on your order summary. If you go to manage button on your upper right of the dashboard, we can then navigate to billing items to see each associated cost for each an every component of our virtual machine instance. The term “suspendable” means, the item can be suspended and you will not be charged while it is suspended, for example when you power off the virtual machine, you will not be charged while powered off (suspended).

Also you may choose to receive notifications for spendings

Please stay tuned for next series which will be on how to remote access your new virtual machine on IBM cloud – let me know your thoughts and how you were able to get started on IBM cloud comments and discussion are welcome 🙂

MailNonUniversalGroup – Distribution List

Happy New year 2020. I wish you more progress this year from where you left off last year. Now let’s dive right to our topic on MailNonUniversalGroup distribution list. So i had a case where users where complaining of not receiving emails sent to a distribution list. After several minutes tracing the messages, it came to a halt with the following interesting details from the trace log:-

——–

Source : ROUTING
EventId : DROP

RecipientStatus : {[{LED=250 2.1.5 RESOLVER.GRP.Expanded; distribution list expanded};{MSG=};{FQDN=};{IP=};{LRT=}]}

——–

Some further digging and here is what i found for the distribution group that was not receiving emails:-

Get-DistributionGroup "nameofmydistributionlist" | fl recipienttypedetails

RecipientTypeDetails : MailNonUniversalGroup

Result shows my distribution group was of type: MailNonUniversalGroup

Further checking on when this group was first created in AD, shows far back as of 2012, and this must have been when it was migrated from previous legacy exchange 2003 to exchange 2010 but was not upgraded to a universal group at that time.

Microsoft recommends to convert all legacy exchange distribution groups to “universal” groups for use on Exchange 2010/2013/2016/2019 especially if you want to have all the features of distribution groups included.

In my case the distribution group members where on office365 and they needed to receive external email sent to the email address of the distribution list.

To solve, change the distribution group from MailNonUniversalGroup to Universal, I did this via exchange powershell:-

Get-DistributionGroup "nameofmydistributionlist" | Set-Group -Universal

wait a few minutes for replication and check again using:-

Get-DistributionGroup "nameofmydistributionlist" | fl recipienttypedetails

RecipientTypeDetails : MailUniversalDistributionGroup

It has now been converted to MailUniversalDistributionGroup

Now we can receive emails sent to the distribution list without any issues.

Tip: To do this in bulk for all your distribution groups that was just migrated over from legacy exchange versions 2003/2007, you can use the following command which will change all mailnonuniversalgroups to universal:-

Get-DistributionGroup -ResultSize unlimited -RecipientTypeDetails mailnonuniversalgroup | Set-Group universal

and then to apply the upgrade :

Get-DistributionGroup -ResultSize unlimited | Set-DistributionGroup -ForceUpgrade

An error occurred trying to connect the WSUS server…

I had this error today, WSUS is installed on Windows server 2016 and used for managing Windows Server updates to several of my Exchange servers. This error appeared today and below is what I did to fix it.

When you click on “reset server node”, nothing happens , the error just reappears. Also you will find event id 7032 windows server update services in the event viewer of your server.

Solution:

  1. Open up IIS – internet information services manager on the affected node

2. locate WSUSpool, by clicking on “Application Pools” after expanding the connections tree from the IIS console

You will see the WsusPool status is “stopped”

3. Start the service

4. Now go back to your WSUS console and click on “reset server node” and after a while it should work and all servers can be found again and you can proceed with your windows updates.

PowerShell Script to easily copy a file and rename in new destination

Sharing with you a simple Powershell script I wrote and use to list all the files names and location information for a given folder and then easily copy that TXT file between other folders in the same server.

E.g:- list all files inside myFolderA and export this info to myFile.txt

This will not copy files between remote servers. That requires a more complex method using Invoke-command and remote powershell authentication

To list content of folder


Get-ChildItem K:\myfolderA\*.*| Set-Content K:\myfolderA\myfile.txt

To copy into myFolderB

$From = "K:\myfolderA\myfile.txt"
Copy-Item -Path $From -Destination "J:\myfolderB\newMyfile.txt" -Recurse -Force

$From = This will be the full path of the file you want to copy

Destination – This will be the destination drive and folder for your copied file

Mail.Que database too large

In this troubleshooting you will learn how to safely delete and recreate the Exchange server transport queue database file “mail.que” and get tips to determine the root cause of your growing mail.que. On deletion of the mail.que file, Exchange will auto create a new mail.que file once you restart the Microsoft Exchange transport service. This applies to Exchange 2010,2013,2016,2019

Below solution will help you avoid messaging downtime, if your mail.que file is getting too large or consuming a lot of space on your disk drive at a critical stage which can cause major impact to mail flow or even Exchange auto shutting down its services, however, be sure to later properly investigate the root cause of the mail.que file growth as it can reoccur. Some known causes of mail.que file growth can be due to organization wide Exchange transport configurations such as the maxdumpstertime(exchange 2010), safetynetholdtime, pipeline tracing value, etc – For me, the safetynetholdtime value on Exchange 2016 was set to 7 days, which resulted in the growth of mail.que as it holds copies of successfully submitted messages for 7 days, another thing was that my day to day mail flow to my Exchange infra had increase from what it used to be several months ago , so i decided to schedule maintenance and expand the disk space where my mail.que resides from 250GB to 500GB , and ever since i no longer have mail.queue space issues. It might also be good to go back to your Exchange Server Role Requirements Calculator to help you determine where you are lacking in terms of disk space requirements, number of inbound messages to your infra etc. and from there you can make adjustments.

By default  your mail.que file location should be at :-  %ExchangeInstallPath%TransportRoles\data\Queue

screenshot-20190116165503-667x215

First, using Exchange powershell we can check the existing size in GB of mail.que, so open up your EMS on the affected Exchange server and run the following:-

Get-ChildItem "D:\Exchange Server\TransportRoles\data\Queue\mail.que" |select name,@{Label="size";Expression={"{0:N0}" -F ($_.Length/1GB)}}

screenshot-20190116161259-906x110

To Solve:-

  1. Put your Exchange server in maintenance mode, if you have SCOM etc, or schedule out-of- office hour maintenance before you proceed to perform these actions.
  2. Suspend Microsoft Exchange Transport service, (NOT STOP). This will drain and allow the current messages in the queue to be processed before it stops accepting new messages to the queue. To do this, on EMS run:- Suspend-service -name "Microsoft Exchange Transport"
  3. Run :- Get-queue  – to check and ensure messages in queues are empty (0).
  4.  Do not worry about shadow redundancy queues, these are fine if it has queues.
  5. Next, stop the MS Exchange transport service, :- Stop-service -name "Microsoft Exchange Transport". Once it has stopped give an extra 5 minutes for everything to settle in.
  6. Open the mail.que location ( %ExchangeInstallPath%TransportRoles\data\Queue) , select all files inside the folder and delete it, optionally you can move it to an external drive with enough space, you can rename it to something like mail.que.old as a backup.
  7. Now, After you have completed above steps. on Exchange management shell enter:- Start-service -name "Microsoft Exchange Transport"
  8. You will see a new mail.que file is auto created by Exchange, and your drive space released and back to normal.
  9. Run on EMS, Get-queue  – to check and monitor and ensure mail flow is back to normal. Above actions will save you from exchange running out of space and shutting down services automatically, and also gives you more time to investigate further on the root-cause of the growth, check event logs, google, technet articles, for more troubleshooting. Good luck.

Tip: use a tool such as Treesize free to get a detailed view of files and the size in your drive. It can come in handy when you want to check the size of files in your exchange server data path.

P.S: Watch out for my next article where I will show you how to change the default directory for your mail.que database, for me I prefer to put it on D:\ or another drive, which is separate from Exchange installation path on C:\ and OS. This is a very good recommendation because you can focus on troubleshooting and increasing the disk space for the mail.que on D:\ without touching your System/Exchange on C:\ drive, also allowing it to be stored on a separate drive from C:\ allows it to make use of the resources on that drive alone.

Managing MailContacts created in Exchange 2007 in our Exchange 2013

Hello,

Today, I will show you how to manage MailContacts in an exchange 2007 / exchange 2013 co-existence scenario and also how to easily migrate your bulk mail contacts from Exchange 2007 to Exchange 2013 , this can also be applied to Exchange version 2010 where you plan to move up to 2013/2016 or when you have co-existence and have to toggle managing MailContacts between the higher and lower Exchange version.

Always Note:-

You cannot use a lower version of Exchange server to modify an Exchange object that was created/upgraded in a higher version of Exchange, and likewise, from a higher version of Exchange you will be first asked to upgrade that Exchange object to a higher version before you can modify it.

Common errors you will face:-

Exchange 2007

Screenshot-20181018122532-446x509

Or via powershell:-

Screenshot-20181018122705-1106x228

From Exchange 2013 powershell when modifying a mailcontact originally created in Exchange 2007 you will get this warning:-

Screenshot-20181018115734-984x220


TIP:-  Always check the Exchange version of the object that you need to modify or migrate, this will make things easier..

In powershell you can run:-

Get-recipient mytest@contoso.de | fl exchangeversion, name, externalemailaddress

This outputs the Exchange version – Exchange 2013  0.20 {15.0.0.0} for the external mailcontact menothappy@contoso.de

Screenshot-20181018122425-698x131

You can check the different Exchange versions on Microsoft technet link here  – https://technet.microsoft.com/en-us/library/hh135098(v=exchg.150).aspx

To upgrade/migrate/modify a mailcontact that was created in Exchange 2007, we want to manage this mailcontact in our Exchange 2013 :-

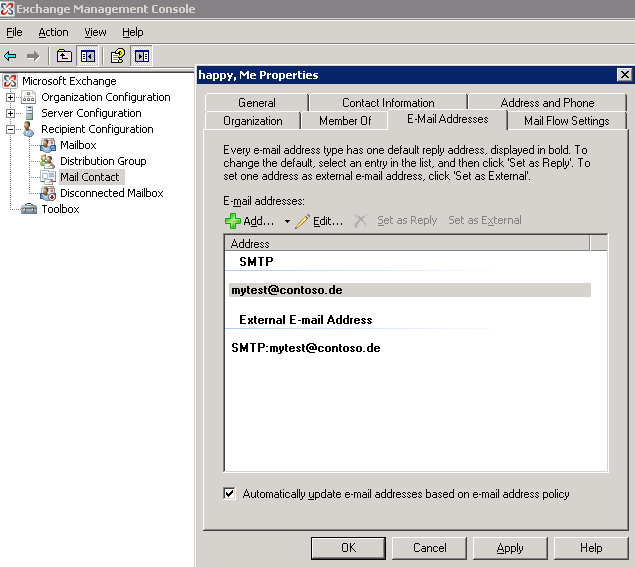
Created in 2007:-

Screenshot-20181018115043-635x567

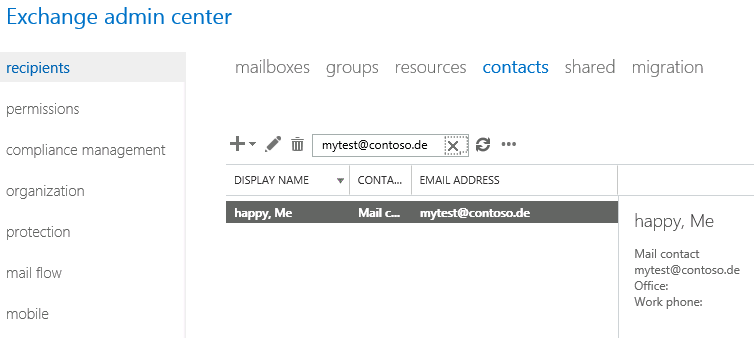
In Exchange 2013:-

Screenshot-20181018115236-754x338


We can run the following commands in Exchange Management Shell in Exchange 2013 to upgrade the mailcontact :-

  1. Get-MailContact ‘Happy, Me’ | fl ExchangeVersion,ExternalEmailAddress
  2. Get-mailcontact ‘Happy, Me’| Set-mailcontact -ExternalEmailAddress ‘mytest@contoso.de‘ -Force:$true
  3. Get-recipient ‘Happy, Me’ -ReadFromDomainController:$true| fl ExchangeVersion,ExternalEmailAddress


To do it from ECP Exchange 2013 (read and accept the warning message):-

Screenshot-20181018115401-621x505

Once completed you can now easily manage the mailcontact in 2013. Lets try to change the SMTP email address from mytest@contoso.de to menothappy@contoso.de :-

Screenshot-20181018120854-891x97

We can do it easily, no more warnings no more errors and in future we can easily change/modify/delete the mailcontact from Exchange 2013.

For Migrating mailcontacts in bulk, you can first use the commands I have provided above to gather information for their ExternalEmailAddress , displayname, put them all in a CSV, name the columns ExternalEmailAddress, DisplayName, then add your mailcontacts external emailaddress and their display names.

You can modify the powershell command above to something like:-

Import-CSV “D:\mycontactsbulk.csv” | foreach {Set-MailContact $_.DisplayName -ExternalEmailAddress $_.ExternalEmailAddress -Force:$true}

First test it with 1 contact and get the results and then you can do it in bulk.